imagine a world where your Slack workspace becomes more than just a hub for collaboration, but also a playground for intelligent bots that simplify your team's daily tasks. in this article, We delve into the powerful realm of the Go programming language and explore how it can empower you to create a dynamic Slack bot. join me on this journey as we unlock the secrets of building a bot that accurately calculates the age of each user. Get ready to harness the simplicity and efficiency of Go as we embark on this exciting adventure!
Requirements:
VS code IDE or Any other IDE,
your Grit.
Before starting the coding of our Slack bot we need to obtain the Slack API keys from the Slack API Site
After navigating to the API site we click on Create New App

Then a pop-up comes we then further click on From Scratch because we want to create the bot from scratch.

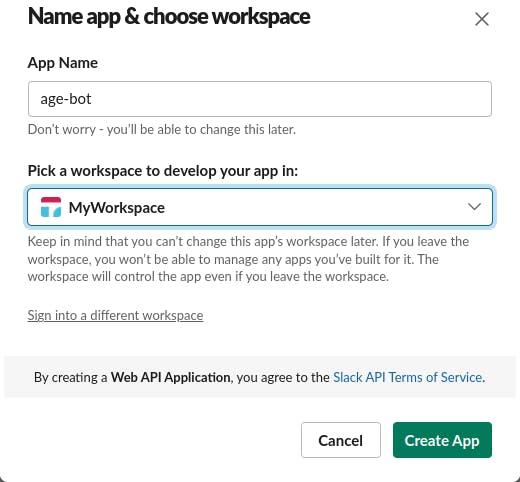
we then configure the bot name and assign a workspace to it, this way the bot would be associated with the desired workspace where it can now execute tasks and be invoked, then click on Create App when done.
On the Settings pane by the left, we click on Socket Mode to enable our bot to use Socket mode this is important because instead of using Request URLs for communication with our bot we rather use web sockets to route the user's interactions and event connection as this is more efficient than sending payloads through Public URLs.

Then toggle the button to enable the web socket mode.

After enabling the web socket mode we get another pop-up to generate an app-level token to enable the socket mode, let's give it the name of the bot then click on Generate.
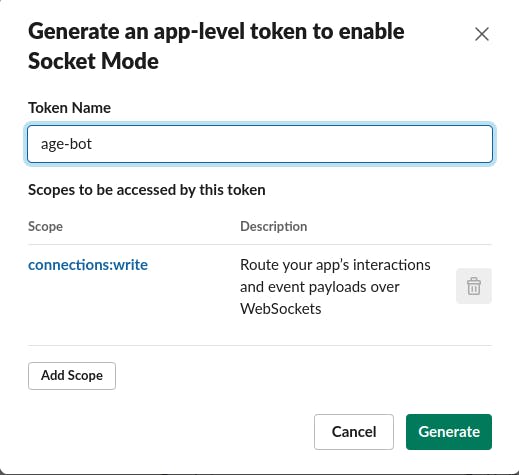
After clicking on generate we get our token, let's save it as it would be used later.

On the Features tab on the left pane, we click on Event Subscriptions to subscribe to some events for our bot.

We then toggle the button to enable it, this is important because it helps notify our bot if it's called in a specific channel or being tagged by a user requesting its service.

Now we need to scroll down to Subscribe to bot events and click on Add Bot User Event.

We then subscribe to these events:
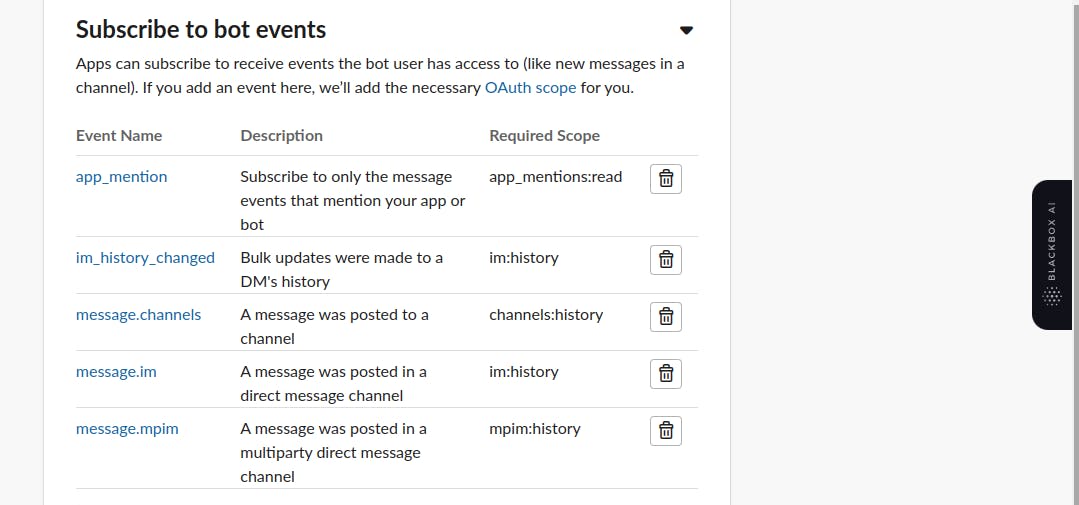
After subscribing to the events we need to grant our bot permission to write to a channel and read from a channel, so we navigate to the Features tab by the left pane and click on OAuth & Permissions to grant our bot the permissions it needs for user interaction.
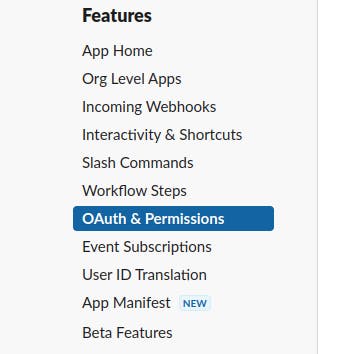
We scroll down to Scopes and click on Add an Oauth Scopes

Then we add the following Scopes:
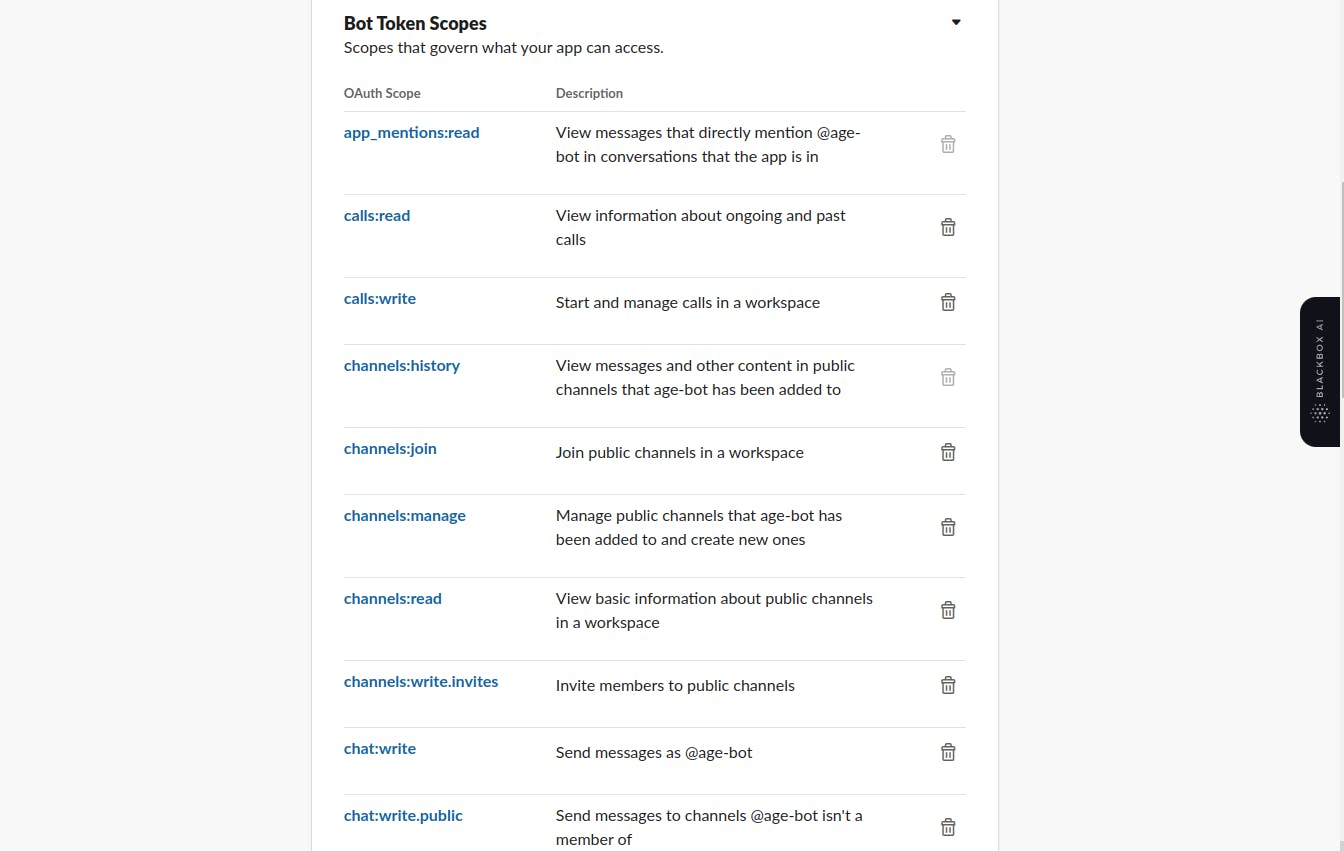
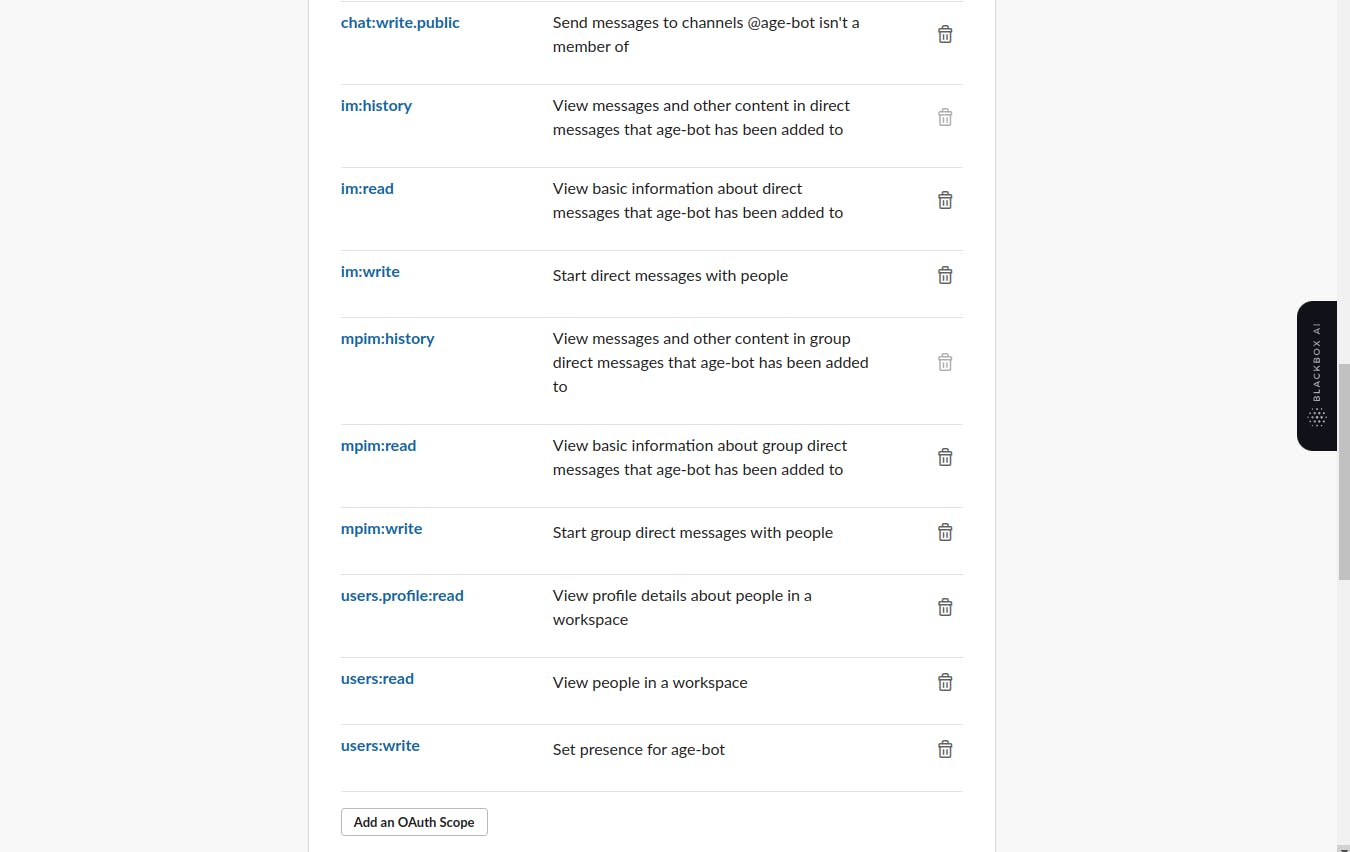
After adding up the scopes we then navigate to the OAuth Token and copy it we would save it for later use.

After this is all done we can now start coding our Slack bot:
we create our working directory in my case it's called Go-Slack-Age_Bot.
In the directory create a file called ".env" and save our token there, the two tokens we copied from the socket and Oauth & permission should be saved in this format:
 SLACK_BOT_TOKEN={Socket Token Here}
 SLACK_BOT_TOKEN={OAuth&Permission Token Here}
You should have something like this when you are done:

In the directory, we create a file named "main.go" this is where we would create our bot backend, let's now fire up VS code.
We start by importing the necessary packages required for the project:
package main

import (
    "context"
    "log"
    "fmt"
    "os"
    "github.com/shomali11/slacker"
    "github.com/joho/godotenv"
    "strconv"
    "time"
)
in the import statement, we imported:
context: which provides a way to manage and handle request-scoped values across API boundaries
log: package provides a simple logging mechanism. it allows us to write log messages to the standard output.
fmt: package provides formatted input and output functions. Offers Println which Is similar to print in Python and also Printf for formatted output just like C.
os: package provides a platform-independent interface to operating system functionality.
github.com/shomali11/slacker: this package is a third-party library for building Slack bots in Go, it provides a high-level framework and utilities to simplify development.
github.com/joho/godotenv: This package is another third-party library that helps load environment variables from a .env file into the Go environment. It allows you to store sensitive information like API keys and tokens in a separate file, enhancing security and facilitating easier configuration, this is what we are going to use to read our tokens saved in the .env file
strconv: The strconv package provides functions for converting string representations of basic data types to their actual values and vice versa. It is often used for converting numbers to strings and strings to numbers.
time: The time package provides functionality for measuring and displaying time and durations. It allows for working with dates, times, and time intervals, enabling tasks such as scheduling events and measuring elapsed time.
func main(){
    err := godotenv.Load()
    if err != nil {
        fmt.Printf("Error loading .env file, got %s", err)
    }
    bot := slacker.NewClient(os.Getenv("SLACK_BOT_TOKEN"), os.Getenv("SLACK_APP_TOKEN"))
We start with the entry point func main() , we then use our godotenv.Load() to load in our .env file from the current path and save the returned error to err , the if condition checks if the previous err is not equal nil and prints out the error if it's not equal.
The slacker.NewClient() function is called to create a new instance of the Slack bot client. It takes two arguments: the Slack bot token and the Slack app token. These tokens are retrieved from the environment variables using os.Getenv(). The os.Getenv() function retrieves the values of environment variables based on their names.
We then now create a function to print out the input command by a user to see the result in the backend before the bot responds to the user
func printCMDEvent(analytics <-chan *slacker.CommandEvent){
    for event := range analytics {
        fmt.Println("COmmand Events !::")
        fmt.Println(event.Timestamp)
        fmt.Println(event.Command)
        fmt.Println(event.Parameters)
        fmt.Println(event.Event)
        fmt.Println()
    }
}
the function collects a channel pointer to the bot command event and print's out the details
go printCMDEvent(bot.CommandEvents())
we then use `go printCMDEvent(bot.CommandEvents())` to pass in the command event to the print function
    bot.Command("my yob is <year>", &slacker.CommandDefinition{
        Description: "year of birth calculator",
        Examples:    []string{"my YOB is 2020"},
        Handler: func(botctx slacker.BotContext, req slacker.Request, res slacker.ResponseWriter){
            year := req.Param("year")
            yob, err := strconv.Atoi(year)
            if err != nil {
            log.Fatal(err)
            }

            CTime := time.Now()
            age := CTime.Year() - yob
            r := fmt.Sprintf("As of %d-%d-%d you are currently %d's old", CTime.Year(), CTime.Month(), CTime.Day(), age)
            res.Reply(r)
    },

    })
This part of the code defines a command for the Slack bot. The bot.Command function specifies a command pattern, "my yob is <year>" which expects the user to provide their year of birth as an argument. The &slacker.CommandDefinition struct is passed as the second argument, providing additional details about the command.
Inside CommandDefinition the Handler field is defined as an anonymous function. This function handles the logic when the command is triggered. It receives three parameters: botctx (the bot context), req (the request object), and res (the response writer).
The code retrieves the year of birth provided by the user from the request parameter year. It then converts it from a string to an integer using strconv.Atoi. If an error occurs during the conversion, it logs the error using log.Fatal.
Next, the code retrieves the current time using time.Now(). It calculates the age by subtracting the year of birth (yob) from the current year. It constructs a response string using, fmt.Sprintf including the current date and calculated age.
Finally, the response string is sent back to the user via, res.Reply which sends the message as a reply in the Slack channel where the command was invoked.
    ctx, cancel := context.WithCancel(context.Background())

    defer cancel()

    if err := bot.Listen(ctx); err != nil {
        log.Fatal(err)
    }
This code initializes the context with cancellation functionality, defers the cancellation to the end of the function, and starts the bot's listening process. If an error occurs during the listening process, the program terminates with a log message indicating the error.
Putting all this together we have our full code:
package main

import (
    "context"
    "log"
    "fmt"
    "os"
    "github.com/shomali11/slacker"
    "github.com/joho/godotenv"
    "strconv"
    "time"
)


func printCMDEvent(analytics <-chan *slacker.CommandEvent){
    for event := range analytics {
        fmt.Println("COmmand Events !::")
        fmt.Println(event.Timestamp)
        fmt.Println(event.Command)
        fmt.Println(event.Parameters)
        fmt.Println(event.Event)
        fmt.Println()
    }
}

func main(){
    err := godotenv.Load()
    if err != nil {
        fmt.Printf("Error loading .env file, got %s", err)
    }
    bot := slacker.NewClient(os.Getenv("SLACK_BOT_TOKEN"), os.Getenv("SLACK_APP_TOKEN"))

    go printCMDEvent(bot.CommandEvents())

    bot.Command("my yob is <year>", &slacker.CommandDefinition{
        Description: "year of birth calculator",
        Examples:    []string{"my YOB is 2020"},
        Handler: func(botctx slacker.BotContext, req slacker.Request, res slacker.ResponseWriter){
            year := req.Param("year")
            yob, err := strconv.Atoi(year)
            if err != nil {
            log.Fatal(err)
            }

            CTime := time.Now()
            age := CTime.Year() - yob
            r := fmt.Sprintf("As of %d-%d-%d you are currently %d's old", CTime.Year(), CTime.Month(), CTime.Day(), age)
            res.Reply(r)
    },

    })

    ctx, cancel := context.WithCancel(context.Background())

    defer cancel()

    if err := bot.Listen(ctx); err != nil {
        log.Fatal(err)
    }


}
Let's install the imported packages, to install the imported packages go provides a very easy way to do so, we could just write :
go mod tidy
This command would help us install the missing packages.
we then run :
go build
if this run without errors then we good to start the bot, we could start the bot using :
go run main.go
After running the command we should have something like this:

if you got that then, congratulations you've just built your Slack Bot
let's now head back to slack to test it out

Slack bot tells us that our bot is not in the channel, so to solve this we simply click on Invite them, after doing that we got our response from the bot :

we could see our request on the terminal :

and that's all we are done, hope you enjoyed it.......
